Creating a Bill
|
RV Park Help |
|


Creating a Bill
Billing is a 3 Step Process, and the Buttons are labeled with the numbers 1, 2, & 3. If a Guest is staying through multiple Billing cycles, you will only use Step one & two until they are actually ready to leave.
Step one; enter the Pay Thru Date and press the 1) Create Bill will print out the Bill for the Customer to review.
 TIP: You can press the Pay Thru Label to enter the set interval of Days to the Last Paid or Arrival date for a quick input, if the Pay Thru date is blank. Otherwise, it will simply add one day to the Pay Thru date entered.
 TIP: This particular output is actually tied to the screen resolution. What that means is if your screen resolution is set small (example: 800 X 600) so that the Windows are big, the Billing Statement output will be cutoff. If your screen resolution is set to something larger (example: 1280 X 768 or more), you should get all of the Billing Statement form output. See System Requirements for how to set your Screen Resolution.
 TIP: When RV Park won't accommodate you charging scheme, you can OverRide the Site Rate. See OverRide Site Rent for more information.
When a Bill is created and you have not set a Payment Type, you will be given a chance to exit before the Bill is printed and set the Payment Type.
Step two; 2) Bill Paid is where the information is actually saved in the Billing database and MUST be done to assure proper tracking and is done when the money is received.
Step three: Once the last Bill is paid and the Guest is leaving, pressing 3) Ck Out will return the site to the availability pool.
When you are ready to create a Guest Bill, double-click in the Pay Thru field on the Guest Information Panel and select the date the Guest will be paid up to. If there are "Other Charges" you need to Bill them for, use the drop-down list to select up to 5 Other Charges. You may want to change the Quantities of the Charges, if so, make those changes. There can also be Rate Adjustments and Discounts you may want to apply.
NOTE: The selected Other Charges will be saved with the Guest.
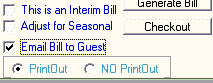
Look for a red Prorated piece of text just above the Form of Payment button in the lower right corner of the window. This will happen if the time frame is NOT exactly a week or 30 days for a month. If you do not want the Bill to be Prorated, simply check the Do Not Prorate checkbox to the left of the Generate Bill Button. If you are billing the Guest for Electricity, make sure you have entered the Current Meter Reading in the Current Meter field on the Panel and the Bill Elect checkbox is checked. The Electric Charge will automatically be entered on the Bill. If the Guest should receive a 10% Discount on their rent, you should make sure the Discount checkbox in the Guest Information portion of the panel is checked.
If the Amount Paid is not the same as the Amount Due, you can press the "=" button just below the Amount Paid field to make them Equal. If they are paying less than the Amount Due, select the Amount Paid field and enter the correct amount being paid.
Once you are satisfied with the information on the Panel, press the 1) Create Bill Button and a paper form will be printed on your Default or selected printer. Once the Bill has been printed, be sure you DO NOT make any changes to the Guest's information. Making changes will cause discrepancies between the Bill printed and the information being captured.
NOTE: If you have the Guest's Email Address, you may wish to Email the Billing Statement to long term Guests. Simply Check the "Email Bill to Guest" checkbox and select whether you want to generate a paper output also; then Save the Guest to retain those preferences. They will receive an HTML formatted Email very similar to the printed Bill. YOU MUST SETUP THE EMail Billing Statement parameters - see HERE for more information.
NOTE: The Guest Email can only have ONE Email address in the Guest Email field!!!
 TIP: You can change the Printer to a PrimoPDF type output and save a PDF file on your computer for Record purposes. PrimoPDF can be downloaded at: http://www.primopdf.com/download.aspx
If you have made an error or need to make changes on the Printed Bill, simply make your changes and re-print the Bill for the Guest once they are corrected.
See Receiving a Payment for how to flag the Bill as Paid.
Understanding the Bill:
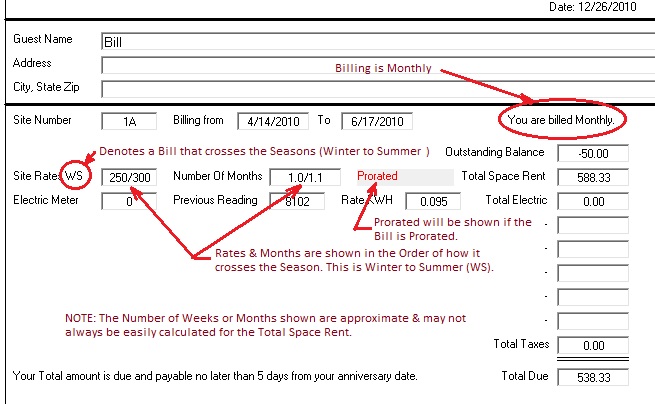
If a Billing Period for Daily, Weekly, or Monthly crosses the Seasonal Rate Dates you may have entered, the Site Rate Line on the Statement will be a little different. A "WS" or "SW" designation will be added to the phrase "SiteRate". If it is "WS", it means the Billing Period started with Winter Rates and then went to Summer Rates. Likewise if the Site Rate text has "SW" added, it means the Billing Period started with Summer Rates and then went to Winter Rates. The Rate value will show both of the rates in the order stated, with a "/" between them. The Number of Days, Weeks, or Months field will also show the respective times with a "/" between them. Due to the complex nature of the calculations, the Total Space Rent amount (even though it is correct) may not be a simple multiple of the rates and time frames. If the Billing has been prorated for extra days, then Prorated will be to the right of the time Billed. By selecting the various checkboxes on the Guest Form, one may be able to provide the Bill you need.
NOTE: The software only figures amounts based on the Billing Type selected. That is, if you have selected weekly; the software assumes Site Rates are based on a week (i.e. 7 days). So if you select a Weekly Type and span 8 or 9 days, the software prorates the extra days in terms of a week. If you selected a 9 day period, it will figure 9/7 of a Week. If you Prorate it, it will drop the extra days and figure only 7. If you want to charge the Guest one week and 2 days, you will need to issue 2 Bills (one at a time). The first one for a weekly rate, and the second (after you have completed the Bill Paid option) for the 2 days under a Daily Rate Type.
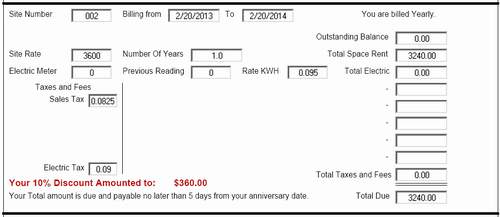
If you have provided a Discount, it will be shown on the printed Bill as shown below.
Created with the Personal Edition of HelpNDoc: Benefits of a Help Authoring Tool