Other Charges
|
Other Charges |
|


Other Charges can serve several purposes. You can track expenses you have for your Park, like Paying the whole Park Electric, or Water/Sewer expenses for the Park, maintenance repairs, etc. as negative cash outlays. You can also enter items you want to sell in a Store as a Point of Sale system; tracking inventory and setting Reorder Points, etc. Or, you can create Charges for Washing a Car, or RV, or some special Meter Fee you wish to levy each month on a Guest. Whatever your needs, you may want to enter things into the Other Charges area.
The interface is fairly simple. You can Change or Delete existing Items by selecting them from the Existing Items dropdown list, or enter a new Item from Scratch.
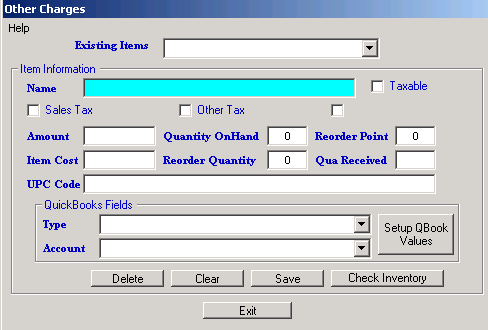
Name - Enter a Name for the Item/Service/Charge
Taxable - Check the Box if the Item is Taxable. At least one of the next Check Boxes would also have to be checked to charge a Tax against the Item.
Taxes Used - These 3 Check Boxes are the Taxes you entered in the Campground Information Setup panel. If you didn't enter a Name for one of the Taxes, it will appear as the third one in the above panel with No Text. Simply check whichever Tax boxes are appropriate for this Item.
Amount - Here you enter the Amount you want to charge for the Item.
Quantity On Hand - is the number of Items you currently have in your Inventory. NOTE: sometimes a Quantity On Hand has no value, example: Car Wash You don't need to track Car Wash for reorder, so just enter 0 and it will not be tracked.
Reorder Point - This is a number, that when your Inventory gets to this point, you want to reorder whatever the Item is. NOTE: If this is an Item that you won't be reordering (like the Car Wash), just leave the number 0.
Item Cost - This is what the Item will cost you to reorder. It is just used to provide you with an estimate of your Order when created. Again, if you are not tracking or reordering this Item, the Cost may not be helpful. If it isn't needed, just enter 0.
Reorder Quantity - This is the number of Items you would typically want to reorder when your Inventory reaches the Reorder Point number. Again, if you are NOT reordering, just enter 0.
Quantity Received - You can use this to update your Inventory. If you enter a number in this field and Save it, your Quantity On Hand will be incremented by the number you enter. There is a better interface to update multiple Items received, which will be covered later.
UPC Code - This is the Universal Product Code which is the Bar Code found on virtually every product. If you have a Bar Code Scanner, using the UPC could really simplify Point Of Sale transactions. You can use the Scanner to enter this field. With the UPC Code field selected, simply use your Scanner and "Bink" or scan the bar code and it will be entered into the UPC Code field. NOTE: You can download a Code 39 Bar Code from our website HERE and create your own Bar Codes to be used for Items that don't have UPC Code. Read the instructions, each Bar Code you create must begin and end with an asterisk ( * ).

Quickbooks Fields - These 2 fields can be associated with each Item entered for extraction purposes to be put in an Excel spreadsheet for importing into Quickbooks.
Simply, select the Type and Account you need for the Item, or use the Setup Quickbook Values button to create a Type or Account not available.
The remaining buttons are used as follows:

Delete - will permanently remove a selected Item.
Clear - will Clear all fields for a New Item entry.
Save - will Update existing Items being Updated or Save a New Item in the Database.
Exit - will close the Panel, returning you to the Setup Panel.
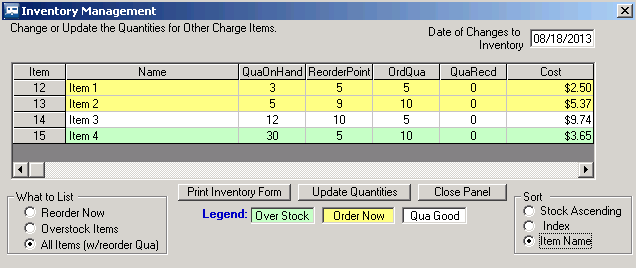
Check Inventory - Is a tool to assess what needs to be reordered, what might be overstocked, and what is properly stocked. Once the order is received, one can also enter received quantities on one panel to save time when updating your inventory. You can also use the Print Inventory Form button to get a complete Inventory list of Items to validate your real inventory.
NOTE: There is another tool that came with RV Park named DataImporter. If you have all of your Store items in an Excel Spreadsheet or CSV file, this tool can import them into the RV Park database quickly. See the DataImporter Help file for more information.
This really concludes the RV Park Training on setting up RV Park, with the exception of the Outgoing Email, if you need that.

The next thing you may want to do is to enter Guests that are already there and any Reservations you may have. Let's look at how that can be done.

Created with the Personal Edition of HelpNDoc: Produce online help for Qt applications