Site Definition
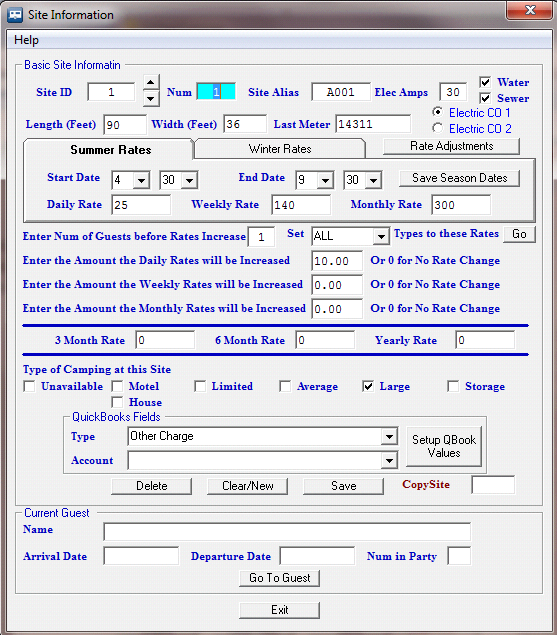
All sites are numeric, that is, the Program uses a number to address the site internally. However, you can use an Alias that the User will see, which can contain alpha characters. In this area you will define each site and it's size and what Site Type it can accommodate, plus the daily, weekly, monthly, quarterly, bi-yearly, or yearly charging rates for each site. There is also a way to standardize the rates by using default rates when the Campground information settings are made that use the Site Type to set the values.
The Site Information panel has really one area that needs to have information entered. One of the nice things you can do to quickly get setup Sites is to enter as much information common to ALL of your Sites and then "Copy" that Site profile as many times as needed to set those Sites. Before we make any settings permanent, lets discuss the Site Alias feature. Note on Site Number 1 there is a Site Alias provided that should be "001". As new sites are added, the Alias will continue to automatically be incremented with the preceding zeros. This is because on the Reservation Grid, you can have the Sites listed in alpha-numeric order. Without the preceding zeros, the list would look out of order. Likewise, if you decide to precede the Alias text with characters like RV or PM (for Park Model), the list CAN be sorted accordingly. You may also consider using text characters at the end of the 3 character numbers to designate special features of the Site, like Pull Thru or Shade with a "P" or "S" respectively. The Site Alias can be a very nice feature if thought through a little before setting up your Sites. The Site Alias can always be changed later, but depending on how many Sites you have in your Park may make it a much larger task ...
OK, lets review the fields ...
Site ID - is a Number assigned by RV Park software that you have no control of. In our opinion, you may want to basically ignore this number. If you never Delete any Sites, the ID should be the same as the Site Number.
Site Number - is a Number used primarily by RV Park Software and should be a unique integer value. This is used in the Guest Panel to link to the Site they are occupying. The Site Number is normally something you need.
Site Alias - As discussed above, this is a text based field displayed in the various panels to designate the Site. It is recommended you use a minimum 3 character string to represent the normal site Number (Example: 002). But you can use whatever approach makes sense to your park. We have one Customer that uses an address number to reflect the Site number (Example: 1935A).
Electric Amps - This field can only be a number. It is used by RV Park Software to determine if a Guest's electric requirement can be met by the amount of Amps at a particular Site. Example: If a Site has 30 in the Amp field and a Guest requires 50, that site would not be suggested as a valid Available Site. If a Site does NOT have electric, simply enter 0.
Water and Sewer - These check boxes are to identify whether or not the Site has Water and/or Sewer. They function similar to the Electric Amp value, in that, if a Guest is set to needing these site attributes, and the Site does NOT have them, it will not be shown as an Available Site when in the Guest panel looking for an Available Site.

Length and Width - These must be a numeric value and represent the largest (Length & Width) RV or Vehicle that can be placed on the Site (not the physical dimensions of the Site). They are also used to select Available Sites for Guests, if provided in the Guest's profile.
Last Meter Reading - This field can be used to enter the Site's last meter reading. When first setting up the Sites, one should enter the value of the Last Paid meter reading. This will be used when Billing Electric for this Site at the next interim Billing period. If the Site will never have Electric Billing, you may want to leave it at 0. If you want to track the usage at sites even though they are not Billed you can also do that by entering the last meter reading.
Electric Company 1 or 2 - Here you can designate whether Electric Company 1 or 2 is used at this site. Electric Companies are setup in the Campground Information setup panel. If you setup both Electric Companies, you can select which company is providing service to this Site by selecting the appropriate radio button.
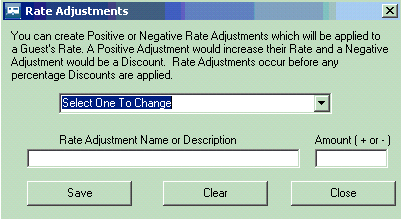
Rate Adjustments Button - The Rate Adjustment button applies to ALL sites. The Site Definition panel is simply where you access the feature for entering Rate Adjustments. These are different than a Percent Discount. Rate Adjustments can be defined to provide Guests with a dollar amount discount or increase that will be applied to either Daily, Weekly, or Monthly rate. The Adjustment can be either positive or negative and are applied to the base values of the guest stay type.

With this panel you can define Discounts or Increased Rates for things like:
Seniors Daily Discount -$5.00
Washer Daily UpCharge $2.00
Armed Forces Discount -$7.00
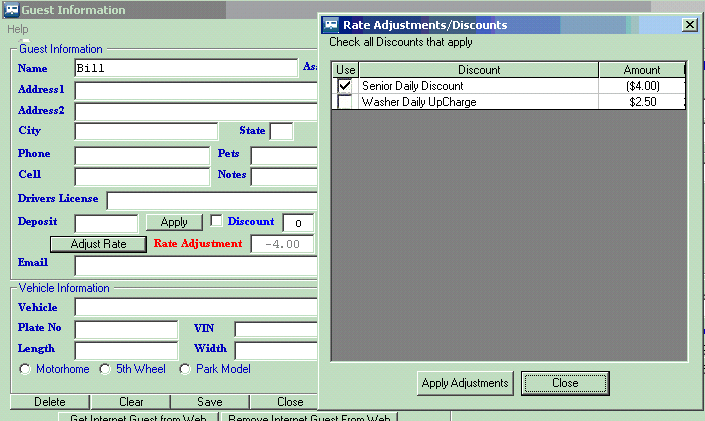
When used on a Daily rental, for 3 days, the total Rate Adjustments would be applied for each day. Likewise, if the rental type is Weekly, it would be applied for each week. The Rate Adjustments are saved with the Guest for Future Reservations/Stays.
To apply the Rate Adjustments, use the "Adjust Rate" button on the Guest panel. When you press the button, a Rate Adjustment panel will be displayed so that you can select as many as needed.

NOTE: The Rate Adjustment label will turn RED to signify that the Rate Adjustment is being applied to the Daily, Weekly, or Monthly periods. If a Discount is also being applied, it will be on the Adjusted Rate.
Summer and Winter or Seasonal Rates - If you want/need to use Seasonal Rates, you will need to enter a Start and End Date for the Summer and Winter. This part of the panel applies to ALL Sites. Once you select the Start and End Dates for the Summer from the drop downs, the Winter Start and End Dates should be correct. Just press the Save Season Dates button and they will apply to all Sites.
NOTE: If you do NOT use Summer and Winter Seasonal Rates, don't set the Dates. Setting them will require you to properly set Summer & Winter Daily/Weekly/Monthly Rates using the Tabs.

Very Important - Rates for Daily, Weekly, Monthly, 3 Month, 6 Month, and Yearly mean, the Guest will be PAYING for that period. A misconception is if a Guest is staying for a Year, you will set them up for the Yearly Pay Rate. Not necessarily true, it is only true if they are paying once, that is, one payment in full for the year. A Guest that is staying for a Year but paying every month is Monthly NOT Yearly. A Guest's Stay Rate is based on how they Pay NOT how they Stay.
Daily/Weekly/Monthly Rates - These Rates are for this Site only. You can have all rates set for all Sites the Same, but note, they can all be different if needed. If you are using Seasonal Dates, you will need to set the Daily/Weekly/Monthly Rates in BOTH Tabs.
Charging Extra for Additional Guests - You can charge extra when more than some number of Guests is in a Site. This applies to this Site, but there is an option to set other Site Types to the Same values. The area below lets you set the number of Guests that are acceptable for the Standard Rate, if you enter values for the Daily, Weekly, and Monthly delta values. If you leave the values "0.00" then no increases would occur.

If you want to set the other Existing Sites Rate Increases to the ones set here you can use the Set Type Drop Box & Go Button below. This will let you use a Site Type to set the Rates.

3 Month/6 Month/Yearly Site Rates - Set the rates for this site to whatever is appropriate.

Type of Camping at the Site - Determine the type of Site this is by checking all Types allowed at this site. Depending on what Site Types (up to 10) you defined in the Campground Information, they can be selected for this Site. These parameters are used when looking for Sites that have the Guest's Type selection for Available Sites. If you check "Unavailable", the Site cannot be occupied and it will be listed in Blue on the Reservation Grid & Maps.

QuickBooks Fields - Each Site can be associated with a QuickBooks Type and/or Account, which can be used when Rent is received into the Billing table of the Database. This will allow you to Filter your Tax/Revenue Reports to only show these records. This can be helpful if you have Cabins and RV Sites and for accounting purposes, you want to separate the records for a report.

NOTE: This applies to just this site.
Delete button - Will permanently delete the active Site. That Site Number will be gone forever.
Clear/New button - Clears the Panel for entering a new Site to be entered.
Save button - Saves the current Site changes.

Copy Site field - allows you to create a number of new Sites with the same settings of the active Site. Simply enter a number, like 25 and the Save button will change accordingly. When you press the Create 25 button, 25 new sites will be created.

You will be given a message with the action to be made.

The bottom of the panel cannot be filled out, it is simply a courtesy panel to let you know who is in the active Site. You can press the Go To Guest button and go to the Guest Panel.

Using the panel you need to define all of the Sites in your park. When they are all defined, you can go to the next step, which is to define the Other Charges.
Created with the Personal Edition of HelpNDoc: Create cross-platform Qt Help files


