Site Setup
|
RV Park Help |
|


Site Setup
Pressing the Clear/New Button will provide the next available number for the New Site being added. If you are editing an existing site, either enter the Site Number to edit in the Site Number field and press Enter or use the up & down arrows to move to the next Site.
The Site Alias, is a feature that allows one to use alpha characters to help better describe the site, like S for Shade; P for Pull thru, and B for Back in. So a Site might be called 14SP; meaning it has Shade and is a Pull thru. There are 7 characters to use for an Alias, so do what helps you. The Default is to add zeros to Site Alias numbers below 100 to support the sorting of Multiple Billing Statements. Example: 003 or 057
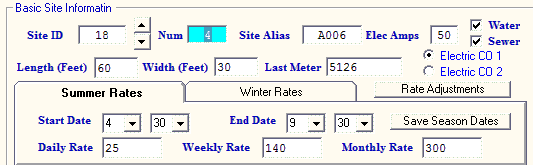
If the Site has no Electrical hookups enter 0, if the Site has 50 enter 50. Enter the highest number of Amps available. Do NOT enter 30/50 or 30/20. Enter an integer value.
Check the boxes if the Site has Water and/or Sewer.
If you are using a Second Electric Company and this Site uses that Company, be sure to check the Electric CO 2 radio button.
Enter the length and width of the RV that will fit in the Site in real numbers ... example 12 or 12.5 for 12 and one half feet.
Enter the last Meter reading for the Site (this will be maintained as Guests come and go).
Enter the rental fees for the Site for Daily, Weekly, Monthly, 3 Months, 6 Months, and 12 Months. Each Site can have it's own fees.

You can charge extra when more than some number of Guests is in a Site. The above area lets you set the number of Guests that are acceptable for the Standard Rate, if you enter values for the Daily, Weekly, and Monthly delta values. If you leave the values "0.00" then no increases would occur.
If you want to set the other Existing Sites Rate Increases to the ones set here you can use the Set Type Drop Box & Go Button above. This will let you use a Camping Site Type to set the Rates.

Lastly, you will determine what type of Site it is. If you determine it is Unavailable, it will never show up for rental purposes. This may be a maintenance reason or the Site may be being used by someone not paying for the spot. If you want the Site to be free, but charge Electric, just make the fees all 0 and rent the Site as usual. The choices for Type can accommodate any or All (except Unavailable), so check as many boxes as are appropriate.
 NOTE: Entering accurate and complete information for each Site will be very important when you are trying to find Available Sites for a Guest that needs certain Site particulars like sewer and 50 amp electric. If you haven't specified these attributes of the Site, you won't return any Available Sites.
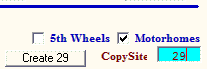
 Tip: If there are several/numerous Sites that have the same (or very close) Setup Values, you can "copy" a site creating as many as needed very quickly by entering a quantity in the CopySite field and pressing the "Create 29" button as shown below:
Note: You can always edit each one created later if there are differences. This is just a quick way to get your sites initially created.
 BIG TIP: There is also a way to prefix a Site Alias with Alpha Characters and begin the series with a particular Number. Example: Lets say you manage RV Sites & Boat Slips at the same facility and you want to organize them in a logical manor. All of the RV Sites could have "RV" in the Site Alias field and then the Site Number. The Boat Slips might use "BS" (and that is for Boat Slips ...) followed by a number. Simply enter RV001 in the Site Alias name as shown below:

Then enter as many Sites as you need (say 25) in the CopySite field and press the Create25 button:

After being warned you are going to create 25 new Sites, you will be asked it you want to Prefix each Site Alias with RV (this is only provided if the Site Alias has Alpha characters in the beginning). If you answer Yes, you will be asked for a Sequence Starting Number. Enter the number you want the copied Sites to start with. That is, if you have already made RV001 you need to enter 2. If you just entered RV001 in the Alias field and the first site doesn't really exist yet, enter 1. It will create 25 new Sites with RV as the first 2 characters and sequential numbers from what you entered in the format ... RV001; RV002; ... ; RV025.
If you are just creating one new Site, make sure you press the Save Button before going to a different Site if changes were made.
 TIP: If you do NOT have Seasonal Rates, just enter the Summer Rates and leave the Winter Rates to all Zero values.
Both the Site ID, Number, and Site Alias fields can be used to find a particular Site quickly. Just enter the exact value and press the Enter key to go to that Site.
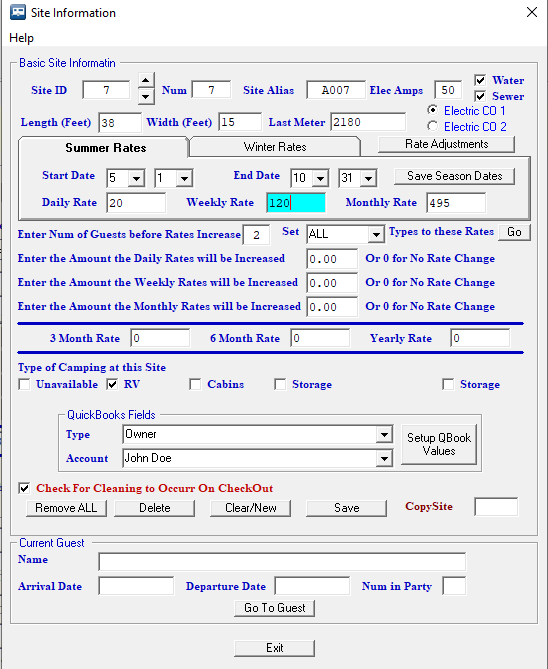
Types of Camping at this Site - You can determine what type of camping can be done at this Site. This will be used when searching for an appropriate Site for a Guest, and can be used to change the rental rates for all Sites flagged with this Type in the Campground Information panel.
QuickBooks Fields - can be used to set the Site's Ownership (See Managing a Park with Owner Sites) or configuring the Tax Revenue report output to be imported into QuickBooks.
Checkbox for Cleaning on Checkout - each SIte can be set to be "Cleaned" when a Guest Checks out ... this may be for a Cabin or Motel Room or even an RV Site you want to be properly maintained. When the Guest is checked out the Next Cleaning field is automatically flagged with the Date & Time the Site was Checked out. A report can be created to identify these Sites. There is a button to Process all the Sites on the report (once Cleaned) to remove the Next Cleaning field and update the Last Cleaned Date field (which also has a report available).
Delete Button - You can Delete a Site anywhere in the series of Sites defined. This is not overly advised, but can be done. There can be no Guests assigned to the Site and no Billings made against the Site. This is usually something done during the initial setup.
If the site is currently occupied, the current Guest will be shown in the bottom of the panel. This is only for information, no changes to this are possible, but you can go to the Guest in the Guest Information Panel by pressing the Go To Guest Button.
 TIP: When creating the Sites, you will be using the Type(s) ... There can be multiple Types associated with a Site. If you need to change the Prices for a particular Type of Site, this can be done in the Park Information panel and, as an example, update prices for ALL Storage Site Type. The point is, you can create a Type that can help with changing Prices on ALL of those Types of sites.
Example: 50Amp could be a Site Type defined and when you want to change ALL of the 50Amp Site Prices it can quickly be done in the Park Information panel.
The QuickBooks Fields are a way to associate a Site with an Account and/or Type. This will provide a tool to Filter your Tax/Revenue Reports from the Billing table of your RV Park Database, or when you use the Export Excel Data tool. You will find this very helpful if you need to separate Billing records for your RV Spaces and maybe Mobile Home Sites. There may be other reasons for you to be able to filter your information ... Once done, any Rent from this site will be flagged with the Account and/or Type you specified in the Billing table.
Remove All - This will remove ALL Sites from the system (except the first one). This is ONLY for initial setup, before you begin creating reservations. You will need help from RezPlot Systems support for the reset password.
The Current Guest information area is just for information purposes and not editable.
Created with the Personal Edition of HelpNDoc: Free help authoring tool