A Simple On-Line Reservations for Your Site with Auto Guest Data Input
|
RV Park Help |
|


A Simple On-Line Reservations for Your Site with Auto Guest Data Input
If you have a website for your business and would like to give Guests the option of filling out their information there, you can. You need to have a website, then, all you need to do is add 3 very simple HTMP pages and you can be taking reservations On-Line. I say simple because, I have created a Form that you can easily add in your Reservations page and it will do virtually all of the hard work for you. The Form you place in your Reservations page will capture all of the information the Guest enters and Hold it for you, while sending them and you an Email with their information entered. When you get the Email you just press a button on the Guest panel and all of their information is retrieved into the Guest Panel. you assign a site and you can then Email them a confirmation Email, then Delete the On-Line instance of the reservation and ... done. Unless you want a Deposit before sending the confirmation, and you need to contact them for their Credit Card, process it, and then send the confirmation.
Steps to Using the On-Line Reservation:
1) Setup RV Software to Retrieve the Reservation - In the Setup panel select the 1) Campground Information option (It's the only thing in Red).

Then Save the change.
2) Setup RVPark to Receive the Reservation - Next, you need to go HERE on my site and register your use of the On-Line feature using your Challenge Code. You can get your challenge code from the Change Key option on the Setup panel:
Enter your Park Name; your Email; and then the Table Boarder Thickness; Boarder Color; Background Color; and Text Color. You will need to provide your Checkout time; the page URL (path) for when they Cancel or are Successful in submitting the form. You can also provide a message at the bottom of the screen.
3) Create and Upload your 3 Pages for the reservation process to your website. You can read an overview and download examples HERE and just change the Challenge code and point to your header, etc. before uploading them to your site. Make sure the pages are named correctly to correspond with your names in step 2.
4) Check it Out on Your Site - Now, go to your site and check out the Reservation page you have created. First, press Cancel and see your Cancel Page. Next, fill out the form and press Submit. If successful, you should see your Submit page and get an Email shortly.
5) Now copy this URL and paste it into your Internet Browser:
http://rvparksoftware.us/ResTest.asp?cocode=YourChallengeCode
Then edit (or Copy & Paste) YourChallengeCode where it says (no spaces) and try it out. You should see your reservation info,
6) If everything is there, you should be able to go to your Guest panel in RV Park and retrieve the information into your blank Guest panel. Use the Assign site button to pick a site for those dates and you can then Save the reservation.

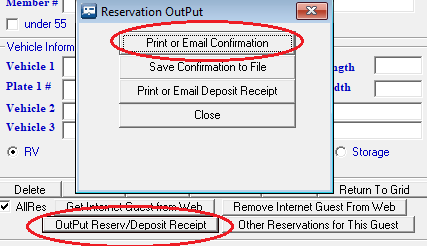
NOTE: If you use the AllRes checkbox, you can retrieve ALL of your on-line reservations at the same time. Then you can select the reservation you wish to process first.
7) You really need to Remove the Reservation from the RVPark website with the other new button. If you don't, you will never be able to get to the next one someone submits on-line!

8) Lastly, if you have setup your Email SMTP stuff right, you can Email a Confirmation with this option:
Enjoy, or get Help ...
Created with the Personal Edition of HelpNDoc: Full-featured Help generator