Campground Setup
|
Campground Setup |
|


The Campground Information Setup panel is fairly large, but contains many of the important settings for RV Park Software. The first thing to note is the panel is divided into several areas. If you work through it one at a time, it won't seem quite so intimidating. NOTE: While you are going thru setting up the areas, just hold your mouse over a field and you will see a Tip displayed describing the purpose or other information about that field.
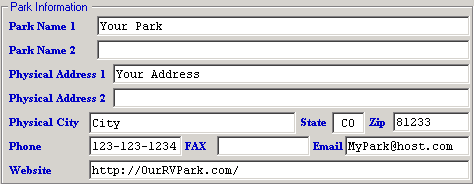
Park Information Area - The first area is where you enter your Park's or Business' information. The information entered will be used on your Billing Statements, Emails, and Main Panel of the software. Key fields include: Park Name 1; Physical Address 1; Physical City; State; Zip; Email; Phone; and Website. The other fields may be used in future releases of the Software.
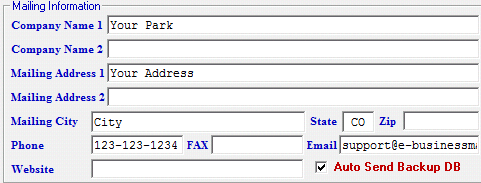
Mailing Information Area - this area will automatically get filled in when you enter the Park Information fields. If you set up your Outgoing Mail, provide an Email address and check the Auto Send Backup DB box, a copy of your DB can automatically be sent to a Corporate or Off Site Owner that needs to create reports of view activity whenever RV Park is exited. They can then place it in their RVPark directory and, using the RV Park Lite version of the software (Free Version), review what is going on.
General Settings Area - The General Settings area lets you set Defaults for some of the programs operations.
NoShow Amount Due on Bill - actually sets the default for showing the amount Paid on a printed Bill. You can change the Default before actually printing a Bill in the Guest Panel.
Show New Version Pop-Up - This will check the Internet to see if a Newer Version available, and is recommended that it is checked. If your computer is NOT connected to the Internet, uncheck the box.
Sort By Alias - Normally your sites are listed on the Reservation Grid in the order they are defined, that is, in the order of their Number. But, you can enter a Site Alias (up to 7 alpha-numeric characters) when you define your sites. Checking this box will cause the Reservation Grid to sort by those Aliases. Make sure the AlphaNumeric sort is what you want, that is, it sorts by the Aliases. Look at the Reservation Grid and be sure you are getting what you are expecting,
Grid Days - can be set from 30 to 190 days. This is how many days will be loaded in the Reservation Grid. NOTE: If you have a lot of Sites, this can slow down how quickly the panel gets loaded. You can always change the Current Date on the Reservation Grid panel to view the date needed. You need to be the judge of what is quick enough.
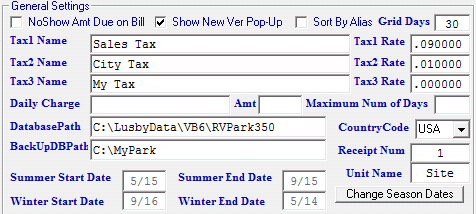
There are 3 Taxes for your use that can be set up and named as you see fit. The taxes can later be applied to Site Rent or Other Charges in whatever combination makes sense. If you enter 0 as a Tax Rate, it is never used, as shown on Tax3 Rate.
Daily Charge - is the Name of a charge you want to standardly apply to all Daily Guests for some number of days. (example: State Recreational Fee)
Amt - is the amount you need to charge for each day.
Maximum Number of Days - number of days you will be charging the Daily Charge.
Database Path - This is the path where you will be storing the Park.MDB database where all your Park data is stored, as well as, the Other.MDB database is stored which is essential for RV Park to operate. When networking RV Park Software, this is how you point back to the Hosting Computer.
BackUp DB Path - is the path to where your Backups of RV Park software database are stored. It is recommended you use an external hard drive, like a USB drive. They are around $50 and if your computer's hard drive fails you won't loose everything.
Country Code - can be set for the United States, Canada, or Australia. This just sets the Zip or Postal codes to a more familiar pattern, as well as, states in Australia have 3 characters.
Receipt Num - sets the number for Billing receipts.
Unit Name - Changes the default RV Site nomenclature within the program to whatever you deem appropriate for your requirements ... Like, Room for a Hotel or Slip or Berth for a Marina. You have up to 7 characters to reflect your requirement.
Change Season Dates - provides you access to set the Season Dates for your Park. NOTE: It is recommended you wait until you define your sites if you need to use this feature, because that is where you will be taken via this button.
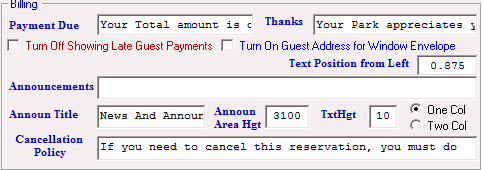
Billing Area - this is where you can create custom messages on your Billing Statements and Confirmation Emails you can send.
Payment Due - This is a statement just to the left of the amount due and can be up to 100 characters.
Thanks - is a short note, centered, at the bottom of the page.
Turn Off Showing Late Guest Payments - This CheckBox is used to turn off the Red Italic Guest Names in the Reservation Grid for those Parks that do not use the Rent Billing feature and don't need to see the Guest Names in the Red Italic.
Turn On Guest Address for Window Envelope - allows you to alter the Billing Statements so that the Guest's Address will be visible in a #10 Window Envelop when properly folded. Also, note the Text Position from Left notes below.
Text Position From Left - is the measurement (in inches) from the left edge of the Billing Statement to the Guest Address. The standard Window #10 Envelope would be .875 or 7/8 of an inch.
News And Announcements - can be one or two columns at the bottom of the page. This area can be used for almost anything you want from Park Rules to News and Announcements.
Announcement Title - field lets you change the Title of this area on the Billing Statement to what you want to call it.
Announcement Area Height - Some printers can produce a larger Billing Statement than others. This field will allow you to experiment with the Height of the area.
TxtHgt - allows you to change the text height of the News and Announcements text area. This helps if you need to have a lot of information on the Statement.
One or Two Columns - you can change the Announcement Area to have two columns for Text if needed by changing the radio buttons.
Network Settings Area - lets you determine if you will be running a single or multiple computers with RV Park Software. Using the Multiple Computer setting would need to be set on all computers networked to the Hosting Computer. This will refresh the Grid and Maps more frequently to help assure currency of the Guests. This is also where you set the system to use the on-line Reservation System. Thereby, turning on 2 buttons on the Guest Panel to retrieve and delete reservations made on-line. You can also turn off the Group Reservations option on the main panel if you don't need this feature.

Electric Company Billing Settings Area - is where you setup the way Electric Billing will be handled. RV Park allows you to have up to 2 different Electric Companies or Electric Billing approaches for your Park. Each Site or Property can use only one of the Companies. Each Company can have up to 3 different Rates based on the Sites use of KWH. In this manor, an Electric Company could charge one rate from 1 to 1400 KWH, and another rate from 1401 to 2000 KWH, and a third rate for anything over 2000 KWH. The Electric Charges can also have a Tax charged against them. The Tax Rate must be entered and the Box must be checked for the Tax to be charged. If the Electric charges are not Taxed, just don't check the Tax Electric box. If there is only one Electric Rate, just enter from 1 to 9999 for the first Range and whatever the Rate is for a KWH, as shown below.

Default Site Rates Area - this area can be used to set which of the 3 standard Taxes should be charged for Rents with the Taxes button and also the Tax checkbox below each Type of Stay must be checked for the Taxes to be applied. This area also can help to change Rates for a Park's Site Types when you want to change Rates for certain Site Types or it will also change ALL sites to the Rates you enter in this area.
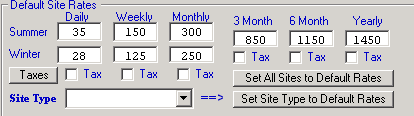
Note the Taxes button, this will open another Panel to determine which of the 3 Taxes will be applied to each of the Site Rate types checked.
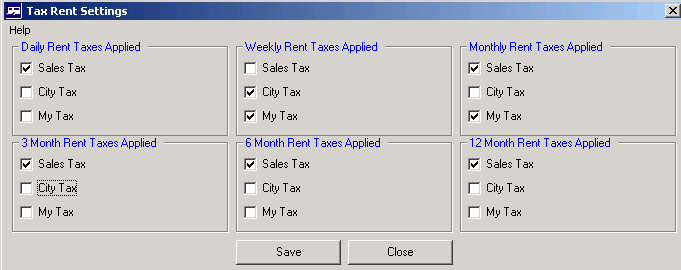
You can see how each of the Rate types can be set for a Tax to be applied ... or not.
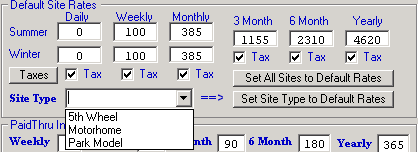
Site Types - You can define up to 10 different Site Types. These are used to determine what a Site can accommodate, or you can also use them to isolate or group Sites for rate changes. This common for Parks that may want to frequently change the Rates for certain sites several times a year. There is a feature called Set Site Type Rates to Default that will be discussed after this. Simply enter a Site Type name you want to use, or you can leave the field blank and it will not be used and the word "None" will be added. Note, it is best to keep the Types in sequence; that is if you need/want 4, use 1-4 not 1, 3, 5, and 8. Also Note, if you change one from ... say Cabin to RV, you may want to review your Site Definitions in Setup and be sure they still make sense. If you changed the text from Motorhome to RV, I would think everything would be fine, it's just when the Type is not the same.
TIP: Use only what makes sense. That is, Motorhome, TravelTrailer, 5th Wheel, are all RVs ... just use RV for a Site Type. Same thing with Cabin, ParkModel, etc. pick one Site Type for them.

The Default Site Type Number will set the selection in the Guest Panel to your default number.
Set Site Type to Default Rates - This is a way to quickly alter all Site Types with this Site Type checked, to whatever rates you have entered into the Default Site Rates area. For this feature, there is no need to save the rates, it is just to change them for one of your Site Types. Just select the Site Type you want to change from the Drop-Down box shown below and then press the Set Site Type to Default Rates button and ALL sites that have that Site Type checked will be changed to the Default Rates entered,
Auto Compress and Backup Database Options - This is a really nice feature that (providing there are no other Users in the Database) it will be compressed and Backed Up automatically when you close the RV Park Software. Remember, you can have a different location set for Back Ups like a different hard drive or computer (Highly Recommended). Compressing the database removes excess space and actually repairs problems in the database. The Back Up is labeled with the day of the week in it's name, which limits you to no more than 7 back ups. Just set the radio buttons to Auto Compress DB and Auto Back Up DB.
NOTE: We have had several Customers that have NOT backed their Database up to a USB External Hard Drive and their Computer has crashed leaving them with NO Backup. You can buy one a 500 GB USB External Hard Drive for less than $70 at Walmart, small price for your sanity and trying to recreate it.

Paid Thru Incrementer - This can be a very handy feature. It is where you can set how many days will be added to the Last Paid Date in the Guest Panel when you Click on the "Paid Thru" label just to the Left of the Paid Thru field. This action will set the next Paid Thru date to what you want as opposed to trying to count days on the Calendar.

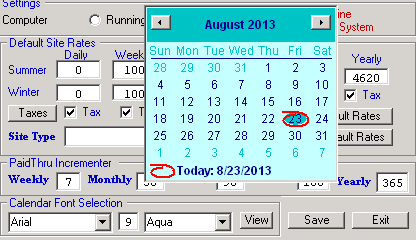
Calendar Font Selection - This is a tool to change the Fonts in the Pop Up calendars used throughout RV Park Software. Some Users have experienced issues with not having certain Fonts on their computers. This allows one to select the Font and Sizes of the text on the Calendars. The first 2 fields are for the Font and Size and the next field is for a Color scheme. Just press the View button to see what your calendar will look like. Remember to Save your configuration.
Save and Exit buttons - are for Saving any changes made to the Campground Information panel and to Exit the Panel and return to the Setup Panel.
This concludes the Campground Information Setup panel. The next area is the Site Definition Setup.

Created with the Personal Edition of HelpNDoc: Free iPhone documentation generator