Guest Panel Entry
|
Guest Panel Entry |
|


1) Go to the Guests/Sites button on the Main Panel.
2) First you need to either enter the Guest Information or if the Guests have been pre-loaded, you can enter a part of their Name in the Name field like "lus" and if there are more than one Guest with that string of characters in their Name, you will get a list to select from.
In our example, I will use Lusby, Bill. After entering all of Lusby's information (or entered lus {& press Enter} and already had him on file to get his data automatically), we can select the Type of Stay, which is Motorhomes at the bottom Left of the Vehicle Information area.
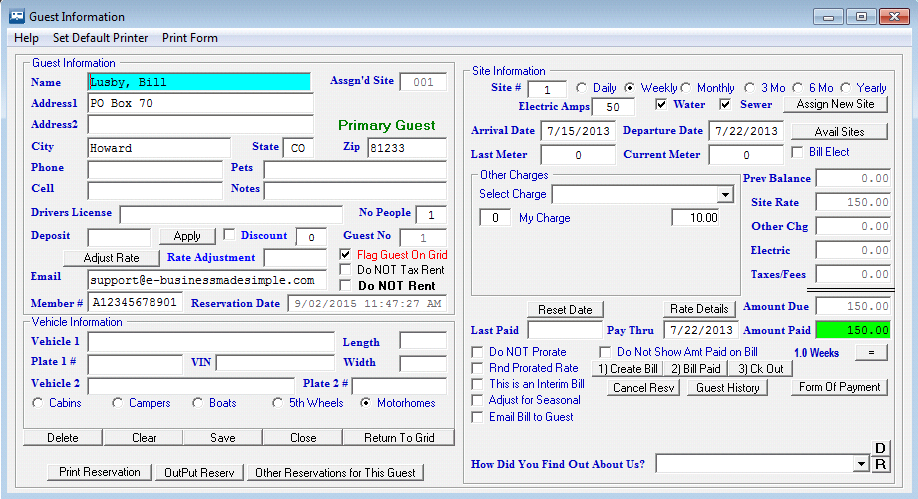
Now it is time to enter the important information for Bill's Stay in the Site Information on the Right hand Side of the Guest panel. Very Important: Select correct Stay Rate to be used ... we are selecting Weekly, because this Guest will be PAYING on a Weekly basis. It doesn't matter how long they intend on staying or if they have entered into a longer term contract with you. If is How They are Going to Pay, that is what this is for. RV Park will use that Rate when figuring their Rent Amount Due.
The next Key piece of information for registering a Guest is their Arrival and Departure date. If you are entering your existing Guests into RV Park, remember we recommend you enter the last date you got paid for their Rent as their Arrival date. This is because when you enter their next "Paid Thru Date", RV Park will calculate their Rent as of their Arrival Date. So, enter the Arrival and Departure dates. NOTE: If you enter a date prior to Today, you will be warned you are entering a date before today. Just press Yes and continue.

Next,, you will need to determine the Guest's Type of Stay or How They Will Pay. We will select Monthly, as shown below ...
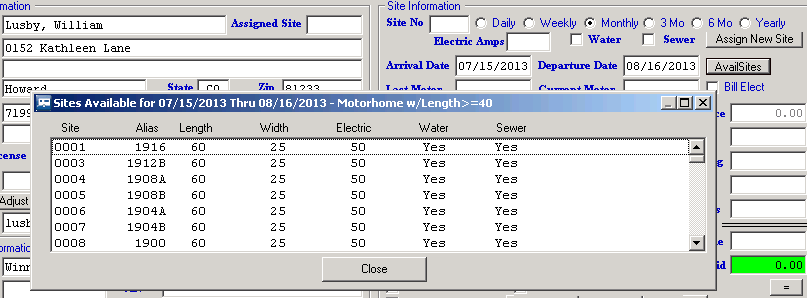
Lastly, you need to press the Available Sites button to select the site where the existing Guest is staying. You can then select the Site they are in from the list. You can also, in this situation, enter the Guest's Site Number in the Site No field as shown below, and press Enter:
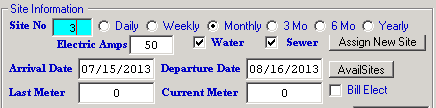
The Site information will be filled in, and you are ready to press the Save button. This will Save the Guest Reservation and you will be ready for the Payment process. Remember, if the Guest decides to extent their Stay, just change the Departure Date (providing the Site they are in is available for that new date). The Arrival and Departure Dates set the Reservation Grid for this site and days to Yellow and lets RV Park know this site is already occupied when making other reservations.
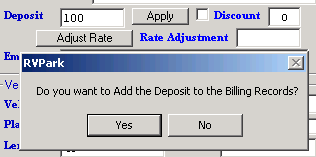
Usually, you will be taking money for whatever Pay Period the Guest will be staying for, or you may be taking a Deposit. You can enter a Deposit and press the Save button and you will get a message about Adding the Deposit to the Billing Records. Usually, you will be refunding or applying the Deposit to the Guest's final Bill. Generally, you will be Applying the Deposit to their last Bill, so it is recommended you Add the Deposit to the Billing Records, so when you apply the Deposit later, the accounting will be right.
You can also register How Did You Find Out About Us, if you want to track where Guests are finding you. This may provide you with information on where to spend your Advertising dollars ...

You can use the drop down to select an existing Advertising Item, or enter a new one and press Enter to Save it. If you have an Item selected, the "R" button will allow you to Revise that Item.
See Processing a Payment for the steps to Billing a Customer.

Created with the Personal Edition of HelpNDoc: Full-featured Kindle eBooks generator