Park Information
|
RV Park Help |
|


Park Information
The Park Information Panel contains a lot of information about your Park and how the program will operate. The Park Information on the top of the panel for the Main Panel information and the Mailing Information for the Billing Statement are being used in various parts of the program. The Billing Statement's phone and Email come from the upper Park Information. If you enter a Website, a Hyperlink will be added to your Main Panel for quick access to your Website (or website entered). The Mailing information Name and Email are used for sending the database out when RV Park is exited to an outside source if needed. The outside source can view and create reports with the Lite version of RV Park for free (can't save any changes). In the Email Address field, you can enter multiple Email Addresses separated by a comma, if you need to send the DB to more than one address. NOTE: You are limited to 255 characters in the Email field.

TIP  : Did you ever want to use an ampersand ( & ) in your Park Name like "Park & Resort" and found it to display as "Park _Resort" ... that is because a single ampersand is displayed as "_" ... to get the display you want, simply enter 2 ampersands together and your text will be as you want it: "Park && Resort" will be displayed as "Park & Resort".
 TIP: 2 - This panel can be "Stretched" to Full Screen or Normal Screen or anywhere in between. Once "Stretched" it will stay that size until either changed or the Program terminated.
The General Settings area allows one to identify as many as 3 Taxes and their rates. In the Billing process, these taxes will be segregated to assist in reporting what moneys were collected.
 Windows 7,8, & 10 Critical Issue: If you are using Windows 7,8, & 10, you need to set the RV Park program's Compatibility settings. This should be done and verified you have done it correctly before doing anything else. See HERE for more information.
One can also alter the default Path for the Database and where Backups/Archives will be stored. This is useful if you want the Database in a different directory than the application and the Backups in yet another directory location. It is also necessary if you want to run multiple computers or link to the database over the Internet. Once you change the Path and save it, the program will recreate the Path.txt file where the information is stored. Before re-starting the application, be sure you relocate or copy the Database(s) to the new Directory, or you will get errors.
NoShow Amt Due on Bill will set the Default for the Guest and Multiple Billing Statement to be checked to Not Show the Amount Due on the printed Billing Statement.
Show New Version Pop-Up will let you know if a new version of the software is available for download when RV Park is first launched. Unchecking the box will disable this feature. Sort By Alias will cause the Reservation Grid to be sorted by it's Alias Name as opposed to it's actual number.
Grid Days are the number of Days displayed on the Reservation Grid. The maximum number of days is 190, and the higher the number, the slower the Reservation Grid window will reload.
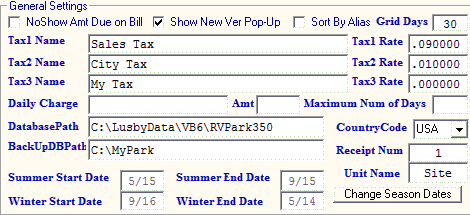
Use the CountryCode setting to change from USA Zip Codes to CAN (Canadian) postal codes or AUS (Australian) postal codes.
Just below the CountryCode is the Billing Receipt Number setting. Here you can set the next Billing Receipt Number. It does require the use of the Database password.
Next is the Unit Name. This is by design "Site" for an RV Site, but one can change it to anything that makes sense for your needs ... Room for a Motel, Berth for a Marina, or whatever is best for your requirements (up to 7 characters).
The Seasonal Dates are displayed here for Reference only. You will need to use the Change Seasonal Dates button to go to where the Changes are made. NOTE: Be sure to first Save any changes you may have made to the Park Information before leaving the window.
The last area is where you can specify what you want on the Billing Statement for when the bill should be paid, and a thank you line at the end of the Bill. There is also a place to enter a "News and Announcements" (or whatever you want to call it) printed on the Bill. The Cancellation Policy area is used at the last of the Email Reservation Confirmation. Just enter whatever standard message you want to use.
There is also a CheckBox to turn off the Red Italic Guest Names in the Reservation Grid for those that do not use the Rent Billing feature and don't need to see the Guest Names in the Red Italic.
 TIP: You can change the "News and Announcements" title to whatever you want using the field entry provided. This will alter what is printed on the Bill. You may want it to say Rules, and reflect critical rules for short term Guests. The title is limited to 30 characters and using some characters may produce unusual results i.e. if you use an ampersand (&), you will get an Under Score (_).
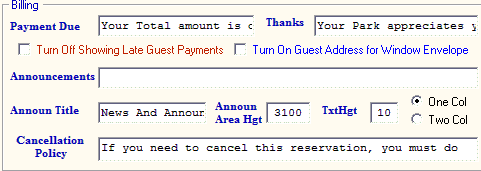
The Turn Off showing late Guest payments option will stop the Reservation Grid from displaying the red italic Guest Names noting their rent is past due.
You can also Turn On the Guest Address in the Billing output to be used in a #10 Window Envelope. You will need to fold the Billing Invoice a little differently, but it should work fine.
If your resolution is set large, you can make the Announcements area of the printed Bill height greater, and that area can be made 2 columns using the Radio buttons shown above. You can also make the text height as small as 8 or as large as 12 in the Announcement Areas.
Electric Settings - Here you determine if the Electric Service is Taxed and the Tax rate. This is also where you set the Rate or Rates for the Electric KWH rates for up to 2 Electric Companies. If you only have one company, just leave the second Ranges and Rates blank. You can set up to 3 different Rates and ranges for those rates to be Billed. This provides you the ability to use one Rate for maybe the first 700 KWH's and then a second Rate for the KWH's between 701 and 2000 and a third Rate for the last 2001 to 9999 KWH's. If you only need one Rate, you can just set the Rate 1 range from 0 to 9999 and then set the rate amount to use. The figure below reflects the settings for all 3 rates to be used on Guests that are Billed for Electricity and a Second Company with only one rate.

 TIP: If the Rates change at different times in the year, you should do an Interim Bill for all Guests with their current meter readings before changing the Rates.
 TIP: There is one Customer that uses the first Range/Rate for 0 to 1 and has their Electric Meter charge and the cost for one KWH, and then the second Range/Rate is 2 to 9999 and just the cost of their KWHs ... this is a slick way to pass on the Meter Charge without listing it on the Bill. You can also list it on their Bills.
You can also change the type or names of the rental areas you are providing. These types make it possible to find which type of rental areas you might be trying to find.

Note the Default Site Type Number field to set the Site Type in the Guest Panel as a Default. It can be set to any of the Types you define, except those with "None" in their field.
TIP: The Site Types can be used to easily change the Rental Rates for a specific Type. Therefore, I recommend using RV as a type and not Travel Trailer, Motorhome, Fifthwheel, as Types since they are all RVs. Use Types that you would use different rates for so you can change all sites that have that Type Checked in the Site Definition panel for those sites, like, RV, Cabin, BoatSlip, Tent, Storage, 30AMP, etc.
 TIP: If you enter "none" (without the quotes), that Type will not be displayed in the Guest or Site setup panels. You can also just leave it blank and the software will fill in None.
The Default Site Rates can be set for ALL sites being rented or you can set the Rates by Site Type (see Set Rates Globally by Site Type).
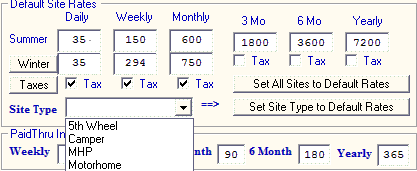
This is also where you determine which type of Guest's will be Taxed for their Rent. In this Figure the Daily and Weekly Guest Rents would be Taxed and the Monthly, 3 Month, and 6 Month, and Yearly would not have their Rent Taxed.
NOTE: You MUST also use the Taxes Button to determine which of the 3 Taxes should be applied in the Taxing process.
 TIP: There is a secret link to load Site 1 Rates into the form by double-clicking the "Yearly" text on the form.
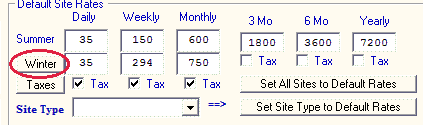
There is now a way to undo Seasonal Rates (if you accidentally set them and no longer want them active). Just press the Winter button and ALL Winter Rates for ALL sites will be set to zero.
The Network Settings area is to flag the Application whether you are using the program in a Multiple use environment.

If you set it for Running Multiple Computers, the Reservation Grid panel will auto-refresh each time you display it. This will better keep in sync with other possible changes other computers are making to the system. NOTE: Depending on how many sites you have this may slow down the response time when the panel is refreshed.
Setting Running Multiple Computers will also not allow the Auto Compress and BackUp settings to be made. This is because multiple computer mean the database is being accessed by more than one computer making it impossible to compress and backup the database.
One can also turn off the Group Reservation component of RV Park with the TurnOff Group Reservations check box.

There is also an area to set Database Management Compression and Back Up to automatically occur when one shuts the system down in the evening, as long as you are running a single computer. Running Multiple Computers may have the Database opened by a second computer making Compressing and Backups impossible. This is a very smart thing to have done automatically. In this way the database is compressed, which keeps is as small and compact as possible and also fixes errors that may occur. Automatically backing up the database, will create a Monday through Sunday copy of the database in case your hard drive or computer crash. That way you won't loose as much data.
NOTE 1: This is Not available if you are running Multiple Computers.
NOTE 2: It is recommended the BackUp/Archive path is to an external drive ... see Backing up RV Park Data.
There is a Paid Thru Incrementer setting to simplify entering the Pay Thru date in the Guest Panel. Set the numbers to what you want to use for each type of stay. Once set, you just press the Pay Thru Label on the Guest panel and RV Park will calculate from the Last Paid or Arrival date by the number of days provided. Then you can pick Do Not Prorate if appropriate.

NOTE: There may be a number of days that may should be used to avoid eviction issues (like 28 versus 30 for a month) calling it "Extended Stay" versus Monthly. Therefore, renting a site for 28 days may be more legally acceptable than a true monthly rental, in case you ever need to evict a Guest.
Pop-Up Calendar Settings - You may need to alter the Fonts and/or Font Sizes used on the pop-up calendars used in RV Park. The fonts listed are from your system, just select the Font you want to use for the Grid (Days) and a Color preference.

Once you have set your preferences, press the View button and see if the Calendar is what you want before Saving. For how to use the Calendar go HERE.
Grid Date Highlighter - You can set a 2 digit Date for the Reservation Grid panel to highlight for whatever reason you may have. The date specified will be highlighted in the selected color for each month. Just set the color to Gray if you don't want to use this feature.

Grid Panel
Customer Defined Checkboxes - there are 2 checkboxes on the Guest Panel that you can now use for whatever you want. On this panel you can enter a 25 character Name or Label for each.
Grid Cell Size - this can be any number of 1 or greater to enlarge the Reservation Grid ... I recommend you use a number like 1.5 to increase the Cell sizes by 50%.

Use the Save button to Save any changes.
Created with the Personal Edition of HelpNDoc: Free CHM Help documentation generator