Guest Information
|
RV Park Help |
|


Guest Information
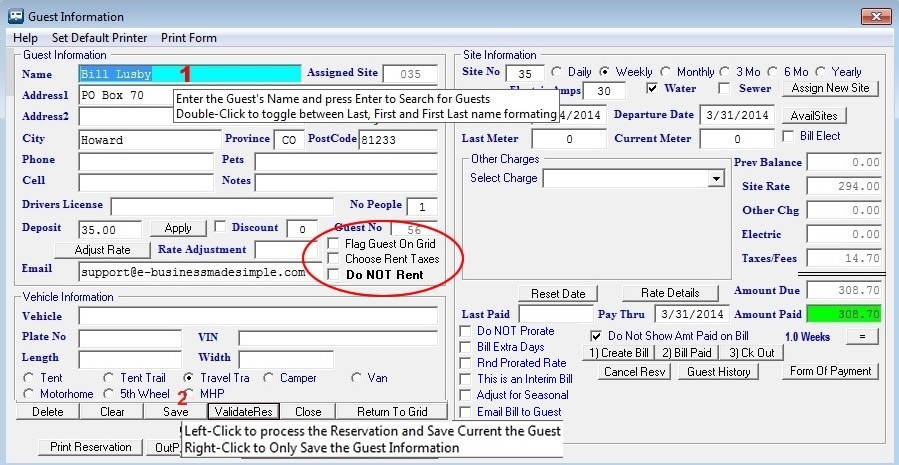
This Panel is the primary Panel used in this application. The Guest Information holds the Guest information, but also acts as a Reservation and Billing Panel. There is a lot going on, but after a few times through the process, it should be fairly clear.
The Top Left area of the Panel contains the Guest's Information. There is also a check box for whatever percent you want to discount off the rent only, and a Do NOT Rent check box for identifying those Guests you don't want to let stay again. Fill out as much information as you deem appropriate. The Deposit field allows you to accept a Site or Electrical Deposit. The Deposit is saved in the Billing and Other and Negative Charges table. When the Guest is ready to leave, pressing the Apply button will refund the Deposit in the Other Charges area.  NOTE: There is also a Notes field that will activate a Pop-Up panel to better view the Guest Notes.
 TIP: As you enter the Guest Information, you can enter the 5 digit USA Zip Code or 6 Character CAN Postal Code or the 3 to 4 AUS postal code and press Enter to look up the City and State automatically. (Only if the City and State fields are Blank.) If it is a new Zip or Postal Code, you can add it to the Zip or Postal Code database.
 TIP: 1 - You can Double-Click the Name field to change from Last, First name format to First Last name format
 TIP: 2 - This panel can be "Stretched" to Full Screen or Normal Screen or anywhere in between. Once "Stretched" it will stay that size until either changed or the Program terminated.
 TIP: 2 - You can use the Save button with a Right or Left Click. Using the standard Left-Click will check for Reservation information being properly entered. Right-Click doesn't check for Reservation Information, it just Saves the Guest data.
 Tip: One can also Flag the Guest in both the Reservation Grid & a Map, by checking the Flag Guest on Grid box (as shown above in the Red Circled area). Flagging a Guest can mean whatever you want. It is recommended you put the reason in the Guest Notes field to understand why the Guest is being Flagged.
Also note the Member Number field. This is an alpha-numeric 12 character field to register a Member Number if needed. Next to it is the Date & Time a Reservation is made.
Another feature of the Guest Panel is Choosing (for each Guest) if you want to charge or not charge specific Taxes. There are situations where you may want to change how a particular Guest gets Taxed. Please See Turn Off Guest Rent Taxes for details.
There are 2 Checkboxes you can use for whatever reason you want for the Guest. NOTE: The first Checkbox has been defined (in the Campground Information area) as "PO Box Assigned" and is RED and Bold since it has been checked. The second Checkbox is not being used and is still defined as "Customer Checkbox Two".
Form of Payment - You can also use the Form of Payment button, just below the Amount Paid field to track how the Guest Payments are made. See Entering Payment Type Information for more details.
Next, you may want to provide vehicle information on the RV staying at your Park..
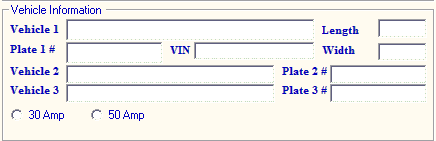
Some Parks want to register the RV and possibly tow vehicle(s). At a minimum, you must chose the type of Motorhome. This is used to find appropriate Sites.
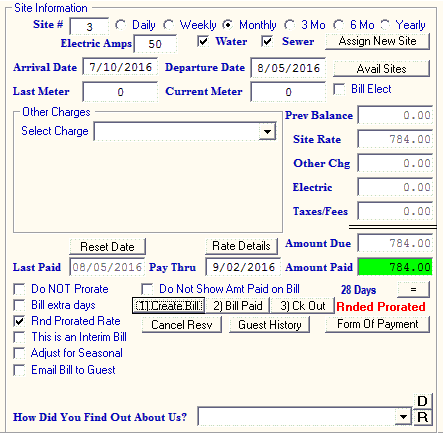
Then, the bottom of the panel contains the Site and Billing information. By entering an arrival and departure date (or Double-Click one of the Fields to get a Calendar) and pressing the AvailSites Button, a pop-up can provide you with all of the Sites that meet the entered criteria. The more information you enter, the more selective the search for appropriate Sites is conducted.
You can Assign a Guest to a New Site, just be sure you have the Electric paid and the Current meter reading correct before you reassign them to the new Site.
If you want to assure the Site is Not prorated, check the Do NOT Prorate check box. This will be saved with the Guest.
 TIP: You can click the Pay Thru label to enter a set number of days from the Arrival or Last Paid date if the Pay Thru date is blank. Otherwise, it will simply add one day to the entered date.
The Bill extra days checkbox is only used for Weekly and Monthly Guests. This is to charge a Weekly rate for the first 7 days, and then the daily rate for extra days at the full price. If you allow prorating, not checking any boxes for 9 days would take the weekly rate, divide it by seven and then multiply that by the nine days. Using the Bill extra days option provides another method for charging a few days over. It just depends on how you want to Bill your Guests.
If a Bill is Weekly or Monthly and is being Prorated because it is being Paid Thru less than 7 or 30 days respectively, you may want to use the Round Prorated Rate check box. This check box will calculate your Weekly or Monthly Daily Rate divided by 7 or 30 and then round it always up to the next dollar and then take that Rate times the number of days being prorated for the Guest's stay. Example: A Monthly Rate of $430 / 30 = $14.33, which would be rounded up to $15 and then multiplied by however many days are in the Month being Prorated. This feature also takes into account any Seasonal Rates.
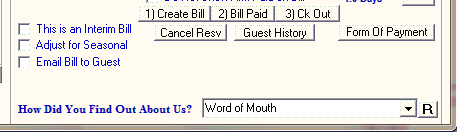
The "This is an Interim Bill" checkbox is generally needed for 3, 6, and 12 month Guests, because they require Interim Bills in between their Rental payments. Use this check box when you want an Interim Bill created.
Adjust for Seasonal check box will calculate a payment period that crosses the Season Date change without adjusting for the rate change. Example: If a Guest is staying for a week, and 3 days are in the Summer Rate period and 4 Days are in the Winter Rate period, the calculation will keep the first (Summer Rate) Rate for the whole week.
Once the Site is determined, press the Save Button on the bottom of the panel to assign the Site to the Guest. From that point forward, the Panel will be used to prepare the Guest's Bill from billing cycle to billing cycle, until the Guest is ready to Checkout of the Park.
See Create Bill, Bill Paid, and Ck Out for additional information. These are VERY IMPORTANT buttons that keep your database correct. Use them correctly.
The Generate Bill button is to create a paper Bill for the Guest, but it also updates the Database so the Guest will be correct when/if you have to come back to it later. NOTE: If you do NOT want the Amount Paid to be printed on the Billing Statement and the Type of Payment, Check the Do Not Show Amt Paid on Bill Checkbox. You can also set the Default for this to be automatically checked in the Park Information General Settings area.
The Bill Paid button is also VERY IMPORTANT, when the Guest has paid you for the Bill (even if less than the Amount Due) be sure the Amount Paid is what you received and press the Bill Paid button. This will create a Billing record entry, and if the Amount Paid was less than the Amount Due, the Guest will be assessed an Outstanding Balance (seen in the Prev Balance field for the next transaction.
The Checkout button is also very necessary. When a Guest leaves the Park, you need to issue a final Bill (returning any Deposits) and after using the Bill Paid button, press the Checkout button. This will clean up any dates and/or balances for the Guest and return the Site to the pool of available Sites. During the Guest Check Out process you MAY be asked if you want to change the Departure Date. This is Only if the Departure Date doesn't match the Last Paid date. Typically, the 2 dates should match. If they should match and you don't keep them correct, the UnOccupancy Report will NOT be accurate.
NOTE: The Guest's Credit Card data will be removed when they are Checked Out also.
New Features as of 7/24/2020
This is to highlight a couple of features you may not be aware of. Note the text in the red circles is a purple color, denoting the text is Special. Hovering your mouse over the text will tell you what the feature does.
1) Departure Date text - depending on whether your Guest is paying weekly or monthly, and the departure date is less than 5 or 25 (Weekly is 5 and Monthly is 25 days) from today's date, the clicking on the text Departure Date will add 7 or 30 days to the Departure Date ... if the month is 31, you can click again and add one more day. Some parks use the Departure Date to remind when the rent is due from those guests. This feature make it a little easier to add the next interval of time REMEMBER TO SAVE THE DATE CHANGE.
2) Site Rate text - clicking on this text when the Bill is ready to process will provide an Override Password panel, so that you can enter a different Site Rate than the one calculated. This is just for this Billing.
3) Pay Thru text - if the Guest is paying Monthly, clicking on this text will add 30 days to the Last Paid Date or Arrival Date, which ever is appropriate. Clicking on it again will add one day each time the text is clicked.

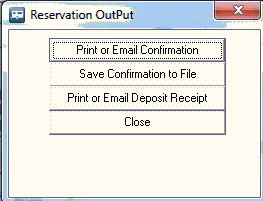
The OutPutReserv button will provide a pop-up for you to Print the Reservation Confirmation or Deposit Receipt, create a text file of the confirmation, or create an Email to Confirm a Reservation if you have properly setup the Email Billing Statement Setup.
The example panel on the left is shown when the SMTP settings are made to preview the information and the example on the right is without the SMTP preview setting.

The Form of Payment button will provide another panel for you to enter the general form of payment the Guest uses, including Credit Card information for you to have if needed, like for reservations over the phone or via the internet. NOTE: In the Form of Payment panel, you can provide a Credit Card Up Charge percentage that will be added to a Guest's Bill if they are set to Credit Card Payments and a percentage has been added. See Entering Payment Type Information for details.
A Guest can be Deleted from the Database. There is no need to do that, but you can if you want to reduce the database size.
Reset Date button allows one to change the Last Paid Date for this Guest when there was an error. Providing a date was already there, the following panel will be displayed:
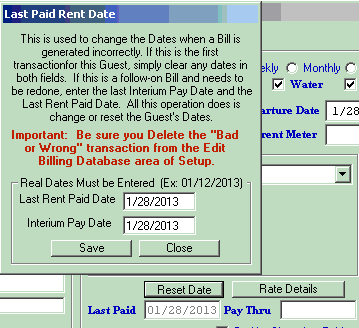
Generally both dates will be changed to the Date you need. Sometimes the Interim Pay Date is different from the Last Rent Paid Date. This is because you may have collected an Electricity payment from the Guest after the normal Space Rent was paid making the displayed date for Last Paid actually the Interim Pay Date. Just be aware that the Last Paid Date on the Guest panel will always be the Interim Pay Date. Note: If this Guest only has ONE Last Paid date ... that is, this is the first time you registered a Payment and it needs to be redone, just blank out both dates and save the transaction. This will just reset the Dates to nothing paid for the Guest. Important, you will need to go to the Edit Billing Database and Delete the Billing Transaction or your Billing records will be wrong.
Rate Details button was added to assist in showing what is being used in the Calculations of the Site Rate field. The following information will be displayed:
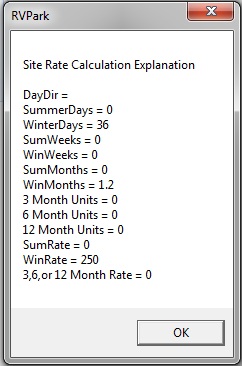
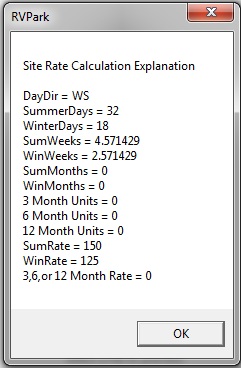
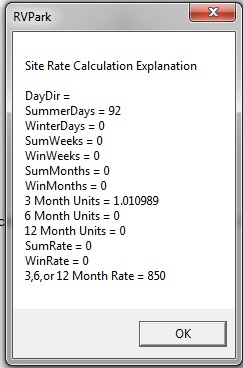
In these examples you can see some of how the Rate is calculated. In the middle example, the Stay crossed over the Seasonal periods from Winter into Summer days, i.e. WS designation. This could be used to clarify or explain how a Billing Rate was determined.
How Did You Find Out About Us? - This is a feature to help determine where your Advertising may be most effective. You can define as many Advertising Phrases and track them with this feature.
Please see Track How Guests Hear About Your Park for more information.
Created with the Personal Edition of HelpNDoc: Free iPhone documentation generator