Data Export
|
RV Park Help |
|


Data Export
This allows you to Export Data from the various Tables of the RV Park database to other applications that accept MS Excel or CSV (comma separated values delimited file) for those that don't have MS Excel.
NOTE: If you don't have (or can't afford MS Excel), there is a wonderful Suite of Office Products with a spreadsheet program that is FREE from Kingsoft found HERE. The page is for Kingsoft Office Suite Free 2013 Download.
 TIP: This is also great for producing your own Custom Report or getting information for a requirement you may have, like how much money a site has brought in over some period of time.
You can begin by selecting the Table that has the information you require; delete those fields you don't want; move the fields to the order you need; determine any Filters you may need to screen the data to include only those records you want; and then Save that structure or configuration to reuse over and over. This area covers how to use the Data Export capability.
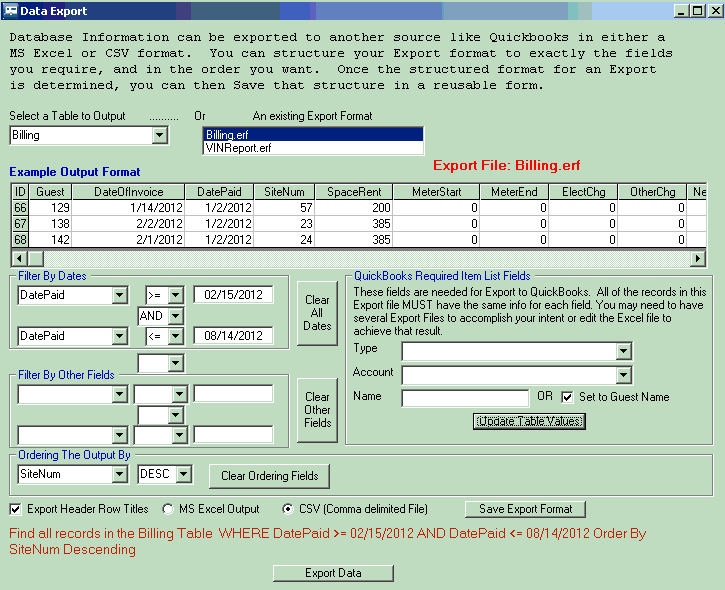
1) Select the Table containing the records you want to Export. All of the fields (and the first 3 records) will be provided in the Grid (Example Output Format) Area. Use the "Full Screen" option in the upper right corner to see more fields.
2) Organize the output structure to contain the Fields you want.
To Delete a field, hold your mouse over the Header Title you want to Delete and press your Right Mouse Button. Selecting OK will remove the Field.
To Move a Field, position your mouse over the Header Title you want to move, hold down the Cntrl Key and then press the Left Mouse Button (keeping them both depressed), drag the mouse to the Field Header Title you want to Move the Selected Field Before and release the Mouse Button. Select OK to move the Field Before the Field you are over.
Continue this process until you have your desired structure.
3) Next is the Filtering of the Data. Filtering is basically setting up rules that will set conditions so that you get only those records you require. For example; if you only want records from the Billing Table where the DatePaid is less than or equal to February 15, 2012, you would Filter the records with a rule stating that: DatePaid <= 2/15/2012
Note, you can also have multiple Filters, each MUST be separated by either AND or OR.
The Form should help you to have a valid Filter set, but not every condition may be controlled. There are 2 areas for you to develop Filters. You can use the first for Dates and the second for Text, Currency, Numeric, or even Boolean (Yes or No/True or False) type fields.
In the second Filter area there is an "evaluator" called LIKE. LIKE should only be used with Text type Fields. This is one of the areas where you could create a bad Filter if LIKE is used with a Numeric, Currency, or Boolean type Field. One can also filter by using IS NULL (or fields without data) or make sure they do have data with IS NOT NULL.
NOTE: If you are Exporting to QuickBooks, there are Fields you will have to have to make QuickBooks Import work properly. Those fields are Name; Type; and Account. All of these Fields are not always required in every Import and the actual names do not have to be exactly as stated, you can map a Field name to what is required.
TIP: The Billing Table does NOT Save the Guest Name, so to easily insert it in the Table, use the Set to Guest Name check box (shown Below) and press the Update Table Values button and the Guest Names will be imported (permanently) into the Billing Table.
NOTE: If you need old Billing Guest Names, using the following checkbox may need to be done before running your report. That is, old Billing entries may not have the Guest Names entered.
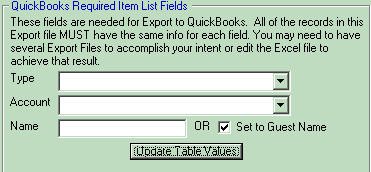
You can also use this area to enter or change the QuickBooks fields for Account and Type. Using the Filtering fields to the left of this area, you can select only those records you want to make the QuickBook changes to before pressing the Update Table Values button. TIP: Once the Billing Table has these QuickBook fields properly set, you can use them when running a Tax/Revenue report from the Reports Panel.
Once the Filter is defined, your Query is displayed in the bottom portion of the panel.
4) You can also Export the Header (Field) Titles to the file by checking the Export Header Row Titles box.
5) Depending upon which Table you are Exporting, you may be presented with a QuickBooks Required Item List Fields area, which can assist you in preparing your Table with some of the required information.
Using this will actually write the selected information into the Table. This action has no affect on RV Park. You can also simply edit the output to provide the needed information if the assistance doesn't give you everything you want.
6) There is also an option to Order the output Ascending or Descending based on one of the Fields. So if you want to "group" the output by Site Number you can use SiteNum and do that, or by Name (if you have imported the Guest Names) and have those records Grouped and sorted alphanumerically.

7) If you like the format of the output and may need it over and over, you may also Save the Export Format for reuse. NOTE: These Export Report Format (.erf) files are saved in the Zip file created in the Send Your DB to RVPark Servers option in the SetUp panel. The Zip file is Saved in your RVPark directory and contains all of your Key files for RV Park Software.
NOTE: What you are creating is a Query to one of the RV Park Tables to get a specific set of records with only the required Fields you need. If you are familiar with SQL Queries, you can also enter the needed qualifier in the dropdown fields like "< or > or =" by just typing it. Be careful that the Query being provided is valid. For more information on SQL Queries see: http://en.wikipedia.org/wiki/SQL
Created with the Personal Edition of HelpNDoc: Full-featured Documentation generator